Create and manage ACF forms directly within Elementor, allowing users to submit data that populates custom fields.
The ACF Frontend Form widget in the DynamicKit for Elementor plugin lets you easily create frontend forms using custom fields built with Advanced Custom Fields (ACF). Seamlessly integrated with the Elementor editor, this widget enables users to submit or update content directly from the frontend—no need to access the WordPress dashboard.
General#
Specify the fields source, label placement, and instruction placement.
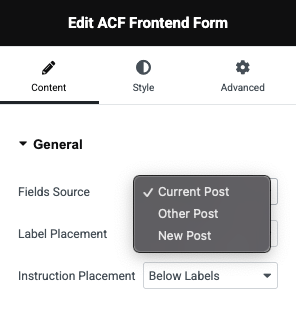
Fields Source#
Defines where the widget pulls ACF field data from:
- Current Post – Uses fields attached to the post currently being viewed or edited.
- Other Post – Allows you to specify a different post ID or object to fetch fields from.
- New Post – Enables form submissions to create new posts with the filled-in ACF data.
Label Placement#
Controls where the field label appears in relation to the input:
- Top – Displays the label above the field input.
- Left – Displays the label to the left side of the field, useful for compact form layouts.
Instruction Placement#
Determines where field instructions (helper text) are shown:
- Below Labels – Shows instructions directly beneath the field label.
- Above Labels – Places instructions above the field label, possibly for higher visibility.
Fields#
Configure whether to show all fields in the ACF form or selective fields.
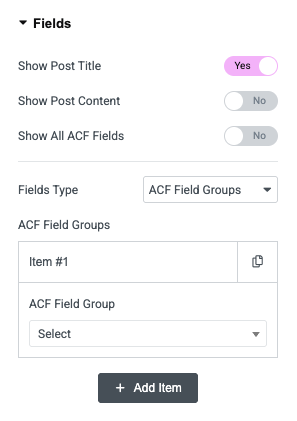
- Show Post Title: Toggle to include a field for editing or entering the post title within the form.
- Show Post Content: Toggle to include a field for editing or entering the post content (main content/body) in the form.
- Show All ACF Fields: When enabled, this automatically displays all ACF fields assigned to the selected post or field group, removing the need to select fields manually.
Fields Type#
Determines how you want to include ACF fields in the form:
- ACF Fields – Lets you manually add and configure individual ACF fields. You can click + Add Item to add multiple fields to the form.
- ACF Field Groups – Allows you to select entire ACF field groups to include in the form. You can click + Add Item to add multiple field groups to the form.
Submit#
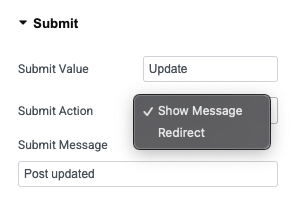
Submit Value#
- This field lets you customize the text that appears on the submit button.
- Example: You can change the button label from the default “Submit” to something like “Update” or “Save Changes”
Submit Action#
Defines what happens after the form is submitted:
- Show Message – Displays a confirmation message (e.g., “Post updated”) on successful submission.
- Redirect – Takes the user to a specific page or URL after submission (usually requires an additional field to specify the URL).
Submit Message#
- If Show Message is selected as the action, this field allows you to set a custom confirmation message.
- Example: "Post updated", "Submission successful", etc.
Additional Settings#

Uploader#
Determines the file upload interface used in the form:
- WP Uploader – Uses WordPress's native media uploader with drag-and-drop support and media library integration.
- Basic – A simple HTML file input, suitable for lightweight or restricted environments where the WordPress media library isn't needed.
Enable Honeypot#
- Adds a hidden input field to the form as an anti-spam measure.
- Bots that fill in this hidden field can be identified and blocked, helping to prevent automated spam submissions.
- Toggle is off by default, but it's recommended to turn it on for improved security.